Bulk Payment Import
Overview
The Bulk Import feature in NEAR Treasury allows you to efficiently create multiple payment requests at once. Simply use our official template (accessible as a Google Sheet), enter your payment data, copy relevant cells (including headers), and paste it into the payment creation flow. This guide will walk you through the process:
Step 1: Complete the Bulk Payment Template
To ensure your data is formatted correctly for import, always start with the official template provided by NEAR Treasury.
Accessing Template
When the Google Sheet opens, you have two options for editing:
- Option A: Make your own copy by going to
File>Make a copyin the Google Sheets menu. Save this copy to your own Google Drive and enter your data there. - Option B: Download the template as an Excel file by going to
File>Download>Microsoft Excel (.xlsx). Save this file to your computer and enter your data using Microsoft Excel or another spreadsheet program.
How to Fill in the Template
Whether you're working in your copied Google Sheet or a downloaded Excel file, the requirements are the same. The file must retain the specific columns in the exact order provided in the original template, including the header row. Do not change the column names in the header row or their order. Below the header row, each subsequent row you add will represent an individual payment request. Here's a description of each column:
| Column | Description | Example(s) |
|---|---|---|
| Type | Defines the type of bulk operation. For creating payment requests, this value must be payment-request. (This column may support other types in the future for different bulk operations). | payment-request |
| Title | A short, descriptive name for the payment request (e.g., purpose or project). This will be visible to approvers. | Oct Marketing Services, Community Grant - J.Doe, Bug Bounty Payout |
| Summary (Optional) | A brief explanation of what the payment is for, providing more context if needed. | Payment for Oct 2025 content creation services., Approved grant for Q4 research project. |
| Recipient | The NEAR account ID that will receive the funds (e.g., yourname.near or a 64-character hexadecimal string). Ensure this is accurate. | alice.near, projectx.sputnik-dao.near, 62a6aa7b25...107a3956 |
| Requested Token | The token you want the payment to be made in. Use common symbols (e.g., NEAR, USDt) for tokens supported by the Treasury, or the token's contract address for other NEP-141 tokens. Please see note below. | NEAR, USDt, usdc.token-contract.near |
| Total Amount | The amount of the 'Requested Token' to be paid. Use a period (.) for decimals. Do not include commas or currency symbols. | 150.75, 2500, 0.05 |
| Notes (Optional) | Any additional notes, references (like invoice numbers or links), or comments for this specific payment. | Invoice #2025-015, For approved proposal ID #123 |
For commonly supported tokens (like those listed in the single Create Payment Request token dropdown), using the standard symbol (e.g., NEAR, USDt) is often sufficient. For other NEP-141 tokens, or to ensure precision, using the token's full contract address (e.g., usdt.tether-token.near) is recommended. The system will validate the token you enter. If unsure, verify the correct symbol or contract address from reliable sources or within the NEAR Treasury app.
Important Tips for Template
- Keep the header row. Do not delete or modify it.
- Remove any sample data rows (rows below the header) before adding your own data.
- Each row below the header represents one payment request.
- You do not need to manually save or export the file as a CSV or Excel. The system handles the necessary formatting from your pasted data.
Step 2: Copy and Paste your Data
Once your data is correctly entered in your working copy of the template (either your Google Sheet copy or your downloaded Excel file):
- In your Google Sheet or Excel application, select all rows, including the header row and all your subsequent data rows (
Ctrl+Aon Windows orCmd+Aon Mac). - Copy the selected data (
Ctrl+Con Windows orCmd+Con Mac). - Navigate to the
Import Payment Requestssection in NEAR Treasury- Navigate to
Payments - Click
+ Create Request - Select
Import multiple Payment Requests.
- Navigate to
- Paste your copied data into the
Paste Datatext area provided (Ctrl+Von Windows orCmd+Von Mac).
Our system will automatically interpret the pasted data and convert it to the required CSV format for processing.
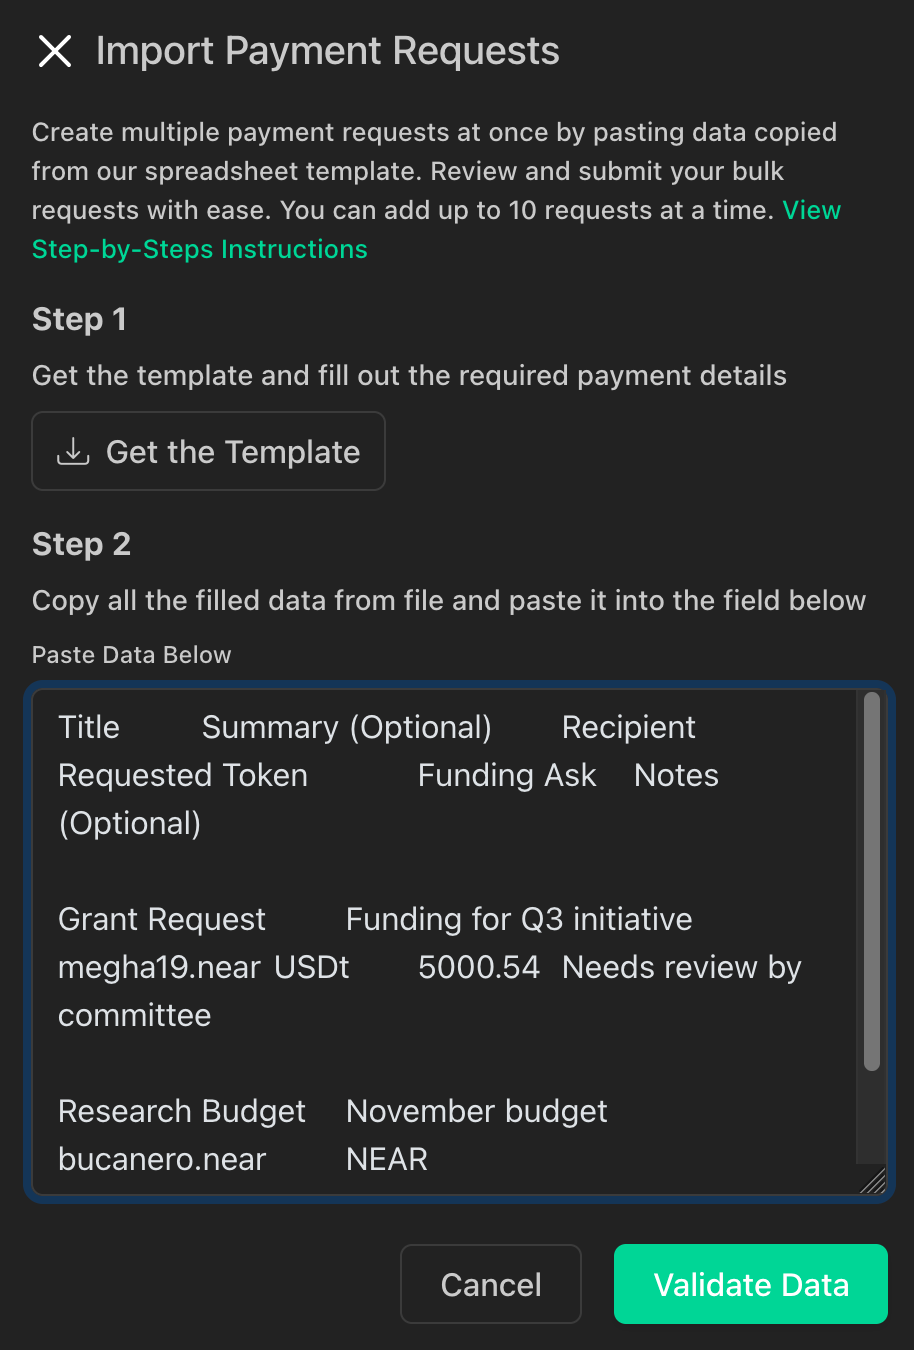
Step 3: Validate Your Data
- After pasting your data, click the
Validate Databutton in NEAR Treasury. - The system will check your data (processing the header row appropriately) for correct column count, required information, and proper formatting in each data row.
- If errors are found (in the data rows):
- A list of errors will be displayed.
- You must correct these errors in your working file, then repeat Step 2 (Copy and Paste) and Step 3 (Validate Data).
- If your data is valid you'll be able to proceed to the next step.
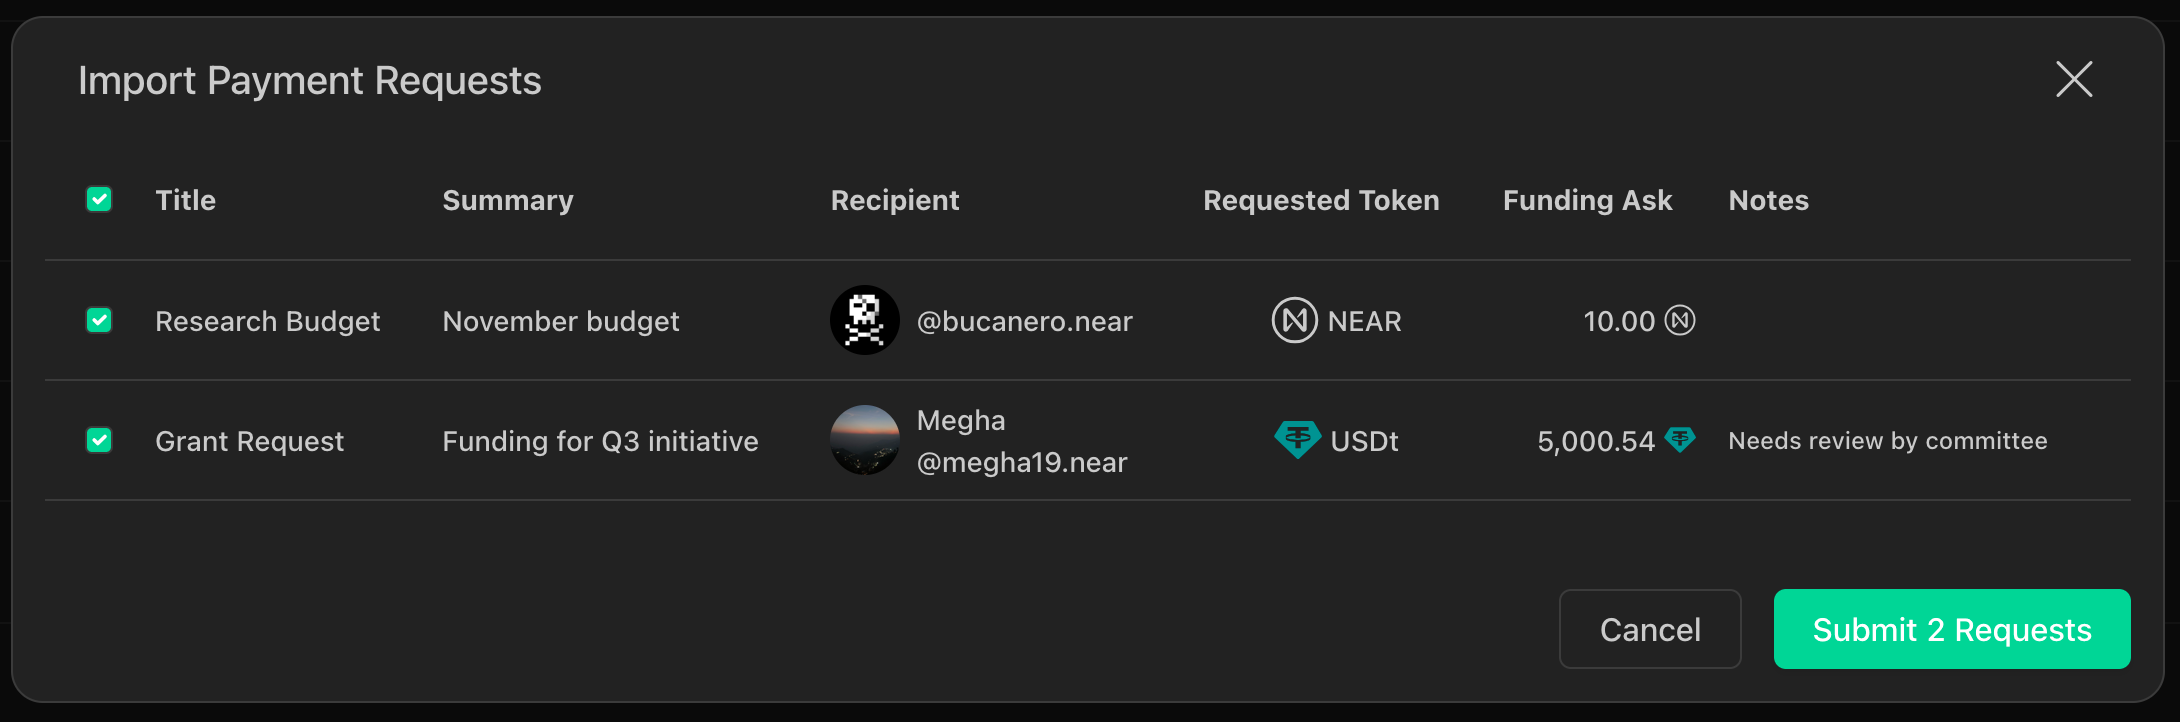
Step 4: Preview and Submit Your Requests
- Click the
Show Previewbutton. - Review the parsed data in the preview table. Cancel and restart if you need to make any changes.
- If everything is correct, click the
Submit X Requests. - Your requests will appear in the
Pending Requestslist, awaiting approval as per your treasury's rules.
Best Practices
- Always Use the Official Template: Download the latest version from NEAR Treasury each time you prepare a new bulk import to ensure you have the correct columns and formatting.
- Start with a Small Batch: If you're new to this feature or importing a large number of requests, try importing just 2-3 payment requests (plus the header row) first. This helps you quickly test your data and understand the process.
- Double-Check Critical Information: Before you copy and paste, meticulously review recipient addresses and payment amounts in your template file. A small typo can lead to misdirected funds.
- Save Your Files: Keep a copy of each template file you upload for your records.
Troubleshooting
Exceeding Import Limit?
- The system allows you to import up to a certain number of requests at a time (e.g., the UI may state "You can add up to 10 requests at a time" ). If you try to paste more than this limit, you may encounter an error, or only the allowed number might be processed. If you have many requests, split them into smaller batches.
Data Not Pasting Correctly?
- Ensure you are copying directly from your template file or a plain text view of your spreadsheet. Sometimes copying from a richly formatted spreadsheet (like Excel directly) can carry over hidden formatting. If issues persist, try pasting into a plain text editor first, then copy from there into the NEAR Treasury paste area.
- Confirm you've selected all rows, including the header row, before copying.
Errors After Clicking "Validate Data"?
- The system will usually indicate which row (referring to the data rows after the header) and field caused the problem.
- Always make corrections in your original template file and then re-copy and re-paste the entire data (including headers).
- Check for Common Mistakes:
- Ensure all required columns have data for every payment row.
- Verify addresses are correct (e.g. name.near, valid hexadecimal strings).
- Ensure the Requested Token symbol or contract address is accurate and supported by the treasury. Refer to the note in Step 1's column descriptions.
- Total Amount should be a number (e.g. 100.50). Do not use currency symbols ($, €) or commas (1,000).
Header Row Problems?
- Make sure you copied the header row exactly as it is in the official template. Do not change header names or their order.
Unexpected Blank Rows?
- Ensure there are no completely empty rows at the end of your data in the template, as these can sometimes cause parsing errors or be misinterpreted.